[SEAGATE] 2.5inch 1TB ハイブリッドドライブ Hybrid Drive(HDD/SSD) ST1000LM014
価格:
12,980円
(2013/04/12 00:10時点 )
最終更新日:2013/12/27
gitとsvnを入れた状態でターミナルで下記コマンドを実行。カレントディレクトリに今日の日付のフォルダが作られてそこにソースをダウンロードしてビルドします。ビルドが終わると最後にパスワードの入力が求められるので入力するとインストールします。
f=`date '+mplayer%Y%m%d_%H%M'`;mkdir ${f}; svn checkout svn://svn.mplayerhq.hu/mplayer/trunk ${f}; cd ${f}; git clone git://git.videolan.org/ffmpeg.git ffmpeg; ./configure; make ;sudo make install
#if HAVE_PRAGMA_DEPRECATED
#    define FF_DISABLE_DEPRECATION_WARNINGS _Pragma("GCC diagnostic ignored \"-Wdeprecated-declarations\"")
#    define FF_ENABLE_DEPRECATION_WARNINGS  _Pragma("GCC diagnostic warning \"-Wdeprecated-declarations\"")
#else
#    define FF_DISABLE_DEPRECATION_WARNINGS
#    define FF_ENABLE_DEPRECATION_WARNINGS
#endif
を次のようにする。
#if HAVE_PRAGMA_DEPRECATED
#    define FF_DISABLE_DEPRECATION_WARNINGS
#    define FF_ENABLE_DEPRECATION_WARNINGS
#else
#    define FF_DISABLE_DEPRECATION_WARNINGS
#    define FF_ENABLE_DEPRECATION_WARNINGS
#endif
	ld_iconv="-L/usr/local/lib -liconv"
	_iconv=yes
を下記の直前に入れる。
fi
if test "$_iconv" = yes ; then
  def_iconv='#define CONFIG_ICONV 1'
else
  def_iconv='#undef CONFIG_ICONV'
fi
echores "$_iconv"
メニュー表示にFontConfigとFreeTypeが必要なのですが、これで両方ともチェックOKになりました。
-lx264 -lmp3lame -liconv
EasySIMBLというものがあるのでそれで解決できます。
テスト環境:10.6.8
なかなか資料が無くて今までずっと謎だったAXWebAreaのAXTextMarkerRange、AXTextMarkerの使い方が参考になるソースをついに見かけてやっとわかったのでメモしておきます。コードが無くて文章だけでわかりにくいかもしれません。
AXWebAreaは下記属性をAXUIElementCopyParameterizedAttributeValueで取得できます。AXTextMarkerが位置、AXTextMarkerRangeが範囲です。これはAXUIElementCopyParameterizedAttributeNamesで取得、確認できます。
{"AXUIElementForTextMarker", "AXTextMarkerRangeForUIElement", "AXLineForTextMarker", "AXTextMarkerRangeForLine", "AXStringForTextMarkerRange", "AXTextMarkerForPosition", "AXBoundsForTextMarkerRange", "AXAttributedStringForTextMarkerRange", "AXTextMarkerRangeForUnorderedTextMarkers", "AXNextTextMarkerForTextMarker", "AXPreviousTextMarkerForTextMarker", "AXLeftWordTextMarkerRangeForTextMarker", "AXRightWordTextMarkerRangeForTextMarker", "AXLeftLineTextMarkerRangeForTextMarker", "AXRightLineTextMarkerRangeForTextMarker", "AXSentenceTextMarkerRangeForTextMarker", "AXParagraphTextMarkerRangeForTextMarker", "AXNextWordEndTextMarkerForTextMarker", "AXPreviousWordStartTextMarkerForTextMarker", "AXNextLineEndTextMarkerForTextMarker", "AXPreviousLineStartTextMarkerForTextMarker", "AXNextSentenceEndTextMarkerForTextMarker", "AXPreviousSentenceStartTextMarkerForTextMarker", "AXNextParagraphEndTextMarkerForTextMarker", "AXPreviousParagraphStartTextMarkerForTextMarker", "AXStyleTextMarkerRangeForTextMarker", "AXLengthForTextMarkerRange", "AXBoundsForRange", "AXStringForRange"}
UIElementをAXWebArea、parameterをAXWebAreaの属性のAXSelectedTextMarkerRangeで取得したAXTextMarkerRangeにしてAXUIElementCopyParameterizedAttributeValueで属性AXStringForTextMarkerRangeを取得すると選択しているテキストを取得できます。
AXUIElementCopyParameterizedAttributeValue( webAreaElement, @"AXStringForTextMarkerRange" , selectedTextMarkerRange, &valueRef);
AXWebAreaの全体のテキストを取る方法は、AXTextMarkerRangeForUIElementをAXWebAreaをパラメータにして実行して全体のAXTextMarkerRangeを取得してAXStringForTextMarkerRangeを実行します。
AXUIElementCopyParameterizedAttributeValue( webAreaElement, @"AXTextMarkerRangeForUIElement" , webAreaElement, &valueRef);
もう一つはAXWebAreaの属性のAXStartTextMarkerとAXEndTextMarkerから全体のAXTextMarkerRangeを作ってAXStringForTextMarkerRangeを実行する方法があります。AXTextMarkerRangeを作るにはAXTextMarkerRangeForUnorderedTextMarkersを使います。これにAXStartTextMarkerとAXEndTextMarkerが入ったNSArrayをパラメータとして渡すと、AXTextMarkerRangeが取得できます。
Evernoteなど編集可能なAXWebAreaのカーソル位置のテキストはAXSelectedTextMarkerRangeからちょっと強引に取得できます。開発用にはAXStartTextMarkerForTextMarkerRangeとAXEndTextMarkerForTextMarkerRangeという、AXTextMarkerRangeから開始と終了を取得するものがあるようなのですが、OSXに含まれているWebKitでは使えないようです。その為、AXBoundsForTextMarkerRangeでAXSelectedTextMarkerRangeの位置を取得して、AXTextMarkerForPositionでカーソル位置のAXTextMarkerを取得(Boundsのx,yをそのまま渡す。画面外のx,yでも動く)、そこからAXLeftWordTextMarkerRangeForTextMarkerで左にある単語(単語がカーソル位置まで来ていたらカーソル位置や右側も含む)をできました。テキストを選択している場合、x,yが選択範囲の端にならない場合があるので選択している場合は使えません。全体のテキストの何文字目かを調べるには上で取得したカーソル位置のAXTextMarkerとAXWebAreaのAXStartTextMarkerからAXTextMarkerRangeForUnorderedTextMarkersでAXTextMarkerRangeを作り、AXStringForTextMarkerRangeでカーソル位置の前までのテキストを取得して調べる方法で可能です。
MenuBarAppleScriptのAppleScriptの命令では次のようにして取得できます。
«event UIElVal_» {"AXTextMarkerRangeForUIElement", "UIEl", "AllTextMarkerRange"}
set theAllText to «event UIElVal_» {"AXStringForTextMarkerRange", "AllTextMarkerRange", ""}

«event UIElVal_» {"AXStartTextMarker", "", "StartTextMarker"}
«event UIElVal_» {"AXSelectedTextMarkerRange", "", "SelectedTextMarkerRange"}
set theSelectedText to «event UIElVal_» {"AXStringForTextMarkerRange", "SelectedTextMarkerRange", ""}

set theBounds to «event UIElVal_» {"AXBoundsForTextMarkerRange", "SelectedTextMarkerRange", ""} -- ,
if theBounds is not missing value then
	set {theX, theY, theWidth, theHeight} to «event TextRE__» {"capture", theBounds, "x=(-?\\d+) y=(-?\\d+) w=(-?\\d+) h=(=?\\d+)", {1, 2, 3, 4}}

	«event UIElVal_» {"AXTextMarkerForPosition", "x=" & theX & " y=" & theY, "StartSelectionTextMarker"}

	«event UIElVal_» {"AXTextMarkerRangeForUnorderedTextMarkers", {"StartTextMarker", "StartSelectionTextMarker"}, "StartToStartSelectionMarkerRange"} -- ,

	set StartToStartSelectionText to «event UIElVal_» {"AXStringForTextMarkerRange", "StartToStartSelectionMarkerRange", ""}
	set theSelectedRangeList to {1 + (count of StartToStartSelectionText), count of theSelectedText}
else
	set theSelectedRangeList to missing value
end if
「Seagate LAPTOP SSHD 2.5インチ SATA3.0 1TB 64MBキャッシュ 5400rpm ST1000LM014」のベンチマークです。
|
[SEAGATE] 2.5inch 1TB ハイブリッドドライブ Hybrid Drive(HDD/SSD) ST1000LM014
価格:
12,980円
|
ターミナルのcpで1244ファイル 755.5MBのファイルのコピーにかかる時間を比べてみました。
各テスト間に10秒ぐらい休憩を入れました。
1秒程度の誤差はあると思います。
ST750LX003は1年ぐらい使った状態。ST1000LM014はST750LX003からファイルを全部コピーした直後の状態。
なお、OSXはOSがファイルをキャッシュするらしいですが2回目以降速いのをOSかSSHDのどっちがキャッシュしているかはわかりません。
| 回数 | ST1000LM014 | ST750LX003 |
|---|---|---|
| 1回目 | 19秒 | 27秒 |
| 2回目 | 8秒 | 9秒 |
| 3回目 | 7秒 | 8秒 |
OSは10.6.8です。
ST1000LM014はST750LX003からOSを含めファイルを全部コピーした直後の状態。
デスクトップにFinderのメニューバーが表示されるまでの時間。多少の誤差はあると思います。
ST750LX003の時間を測っておくのを忘れたのですが、ST1000LM014より早かったような、きのせいなような。
| 回数 | 起動時間 | コメント |
|---|---|---|
| 1回目 | 2分15秒 | コピー後最初の起動なので何かしてたのかな? |
| 2回目 | 1分18秒 | |
| 3回目 | 1分10秒 | |
| 4回目 | 1分4秒 | これの計測後2時間30分ほど普通に使用 |
| 5回目 | 57秒 | |
| 6回目 | 47秒 | この辺ぐらいまで再起動 |
| 7回目 | 53秒 | ここぐらいからシステム終了してから電源オンにするようにした |
| 8回目 | 50秒 | |
| 9回目 | 52秒 | あまり変わらなくなったのでとりあえず終了 |
| 約一ヶ月ぶりに計測(5/10) | 40秒 | 久しぶりに測ったら10秒早くなってました! |
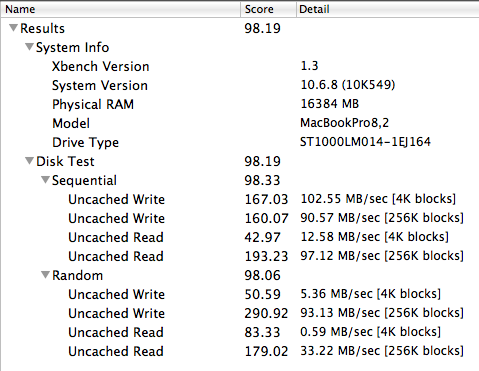
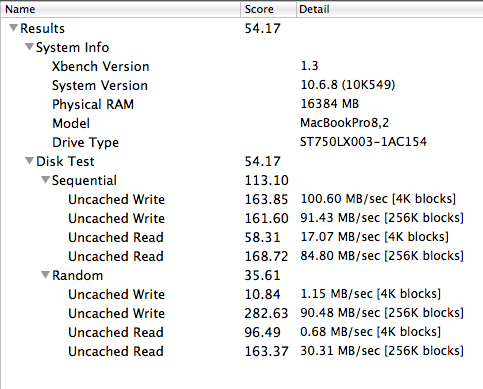
あまり参考にならないとも聞いたことのあるXbench
ST750LX003は1年ぐらい使った状態。ST1000LM014はST750LX003からファイルを全部コピーした直後の状態。
MacBook Pro 15 early 2011のバッテリーの充電をソフトウェア制御でオン・オフするに移動しました。
作業用にMQ01ABD100HにOSをいろいろ入れたので記念にOS別起動時間の記録を取っておきました。
124GBで8個に切ってあります。

beepとダイアログを表示するAppleScriptアプリケーションを登録して、音がなったりダイアログが表示されたら起動したとしてストップウォッチを停止。単位は秒です
| OS | 1回目 | 2回目 | 3回目 | 4回目 | 5回目 | 6回目 |
|---|---|---|---|---|---|---|
| 10.9.1 | 37.3 | 34.3 | 32.8 | 32.5 | 32.3 | 32.3 |
| 10.8.5 | 32.6 | 37.2 | 30.8 | 28.9 | 29.9 | 28.9 |
| 10.7.5 | 34.9 | 33.5 | 26.4 | 26.6 | 26.7 | - |
| 10.6.8 | 24.8 | 22.8 | 22.3 | 22.6 | 22.5 | - |